Best Settings for Capturing Starry Skies on Your Travels
15 June 2025
Ever looked up during a trip—maybe in a remote desert, on a mountain, or at the beach far from city lights—and just stared in awe at the stars? You probably thought, "I need to take a picture of this." But then you snapped one, looked at your phone or camera screen...and nothing. Just blackness. Maybe a dot or two. Sound familiar?
Capturing the night sky, especially its starry beauty, isn't about pointing and shooting. It’s part science, part art—and 100% satisfying once you get the hang of it. Let’s break it down, step by step, so next time you're traveling and come across that magical, star-filled moment, you’ll be ready to freeze it in time.
Why You Can’t Use Auto Mode for Star Photography
Here's the thing—your camera's auto settings are built for daylight or well-lit environments. Night photography? Not so much. Cameras struggle to focus in the dark, and if the shutter closes too soon, stars just won’t show up. So, we’ve gotta take manual control. Don’t worry—it’s easier than it sounds.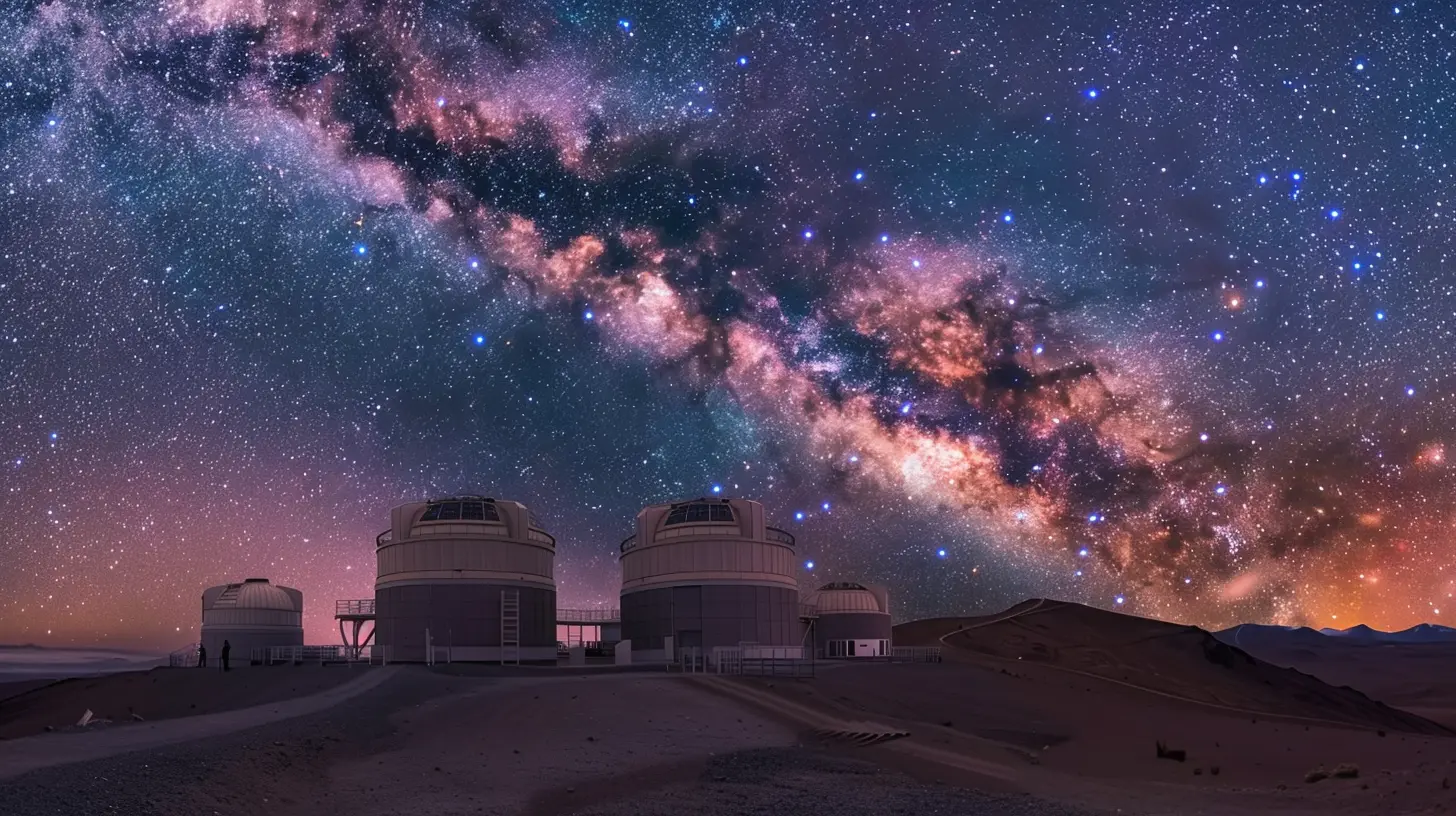
First Things First: Gear Up Properly
1. Camera with Manual Controls
Sure, some smartphones now have half-decent low-light features, but to truly get those crisp, dreamy star shots, you’ll want a DSLR or a mirrorless camera with manual mode. It gives you control over all the important stuff: shutter speed, ISO, and aperture.2. Sturdy Tripod
No tripod = blurry mess. Your shutter’s going to be open for several seconds. Even the steadiest hands can’t prevent motion blur. Imagine a star-studded sky looking more like a smeared oil painting. That’s what happens without a tripod.3. Wide-Angle Lens (f/2.8 or lower)
Stars are little pinpoints of light, and you want to catch as many as you can. A wide-angle lens helps cover more sky, and the low aperture allows in heaps more light. That combo? Chef’s kiss.4. Remote Shutter or Timer
Pressing the shutter can shake your camera slightly, which is bad news for long exposure shots. Use a remote shutter or set a 2-5 second timer. Easy fix!
The Holy Trinity: Shutter Speed, Aperture, ISO
1. Shutter Speed: Let There Be (More) Light
Stars are light years away, so you need to give your camera time to gather that light—literally.A good rule of thumb? The 500 Rule.
Just divide 500 by the focal length of your lens. Shooting with a 20mm lens? 500 ÷ 20 = 25 seconds. That’s your max exposure time before stars start trailing (unless that’s the effect you're going for).
But remember: the longer the exposure, the more you risk Earth’s rotation turning stars into streaks. For tack-sharp stars? Stick to 20-25 seconds max. Test and tweak.
2. Aperture: Keep It Wide Open
Use the widest aperture your lens allows—ideally f/2.8 or wider (like f/1.8 or f/1.4). The lower the f-number, the more light hits your sensor. That means brighter stars and less noise.Worried about sharpness at wide apertures? Don’t be too picky. When shooting stars, a little softness is fine. We’re chasing vibe over perfection here.
3. ISO: Bright Enough Without the Grain Party
ISO controls how sensitive your camera is to light. For star photos, you're generally looking at an ISO between 1600 and 3200.Higher ISO = brighter image, but too high = grainy mess. Every camera has a sweet spot, so play with it. For example, newer full-frame cameras handle ISO 3200 like a champ. Crop sensors? Maybe stop at 1600 or so.
Focus: The Trickiest Part
Manual Focus Is Your Best Friend
Autofocus doesn’t work well in the dark—it’ll just hunt and hunt. Switch your camera to manual focus.Here’s a simple method:
1. Use Live View mode.
2. Zoom in digitally to a bright star or distant light.
3. Slowly adjust the focus ring until the star becomes as sharp as possible.
4. Lock it. Don’t touch it after that.
If you’re in total darkness, shine a flashlight at a far object and focus on that.
Pro tip? Tape your lens ring in place once focus is spot-on. You don’t wanna bump it in the dark by accident.
White Balance: Keep the Colors Real
Auto white balance can give your stars a weird tint. For true-to-life shots, set your white balance manually. Starting around 4000K gives a neutral sky color, leaning slightly blue. You can always tweak tones in post-processing, but starting with a balanced shot saves tons of editing time.Shoot in RAW. Always.
JPEGs compress and discard data—bad news when you're dealing with subtle light differences. RAW files preserve everything, giving you far more flexibility when editing. Trust me, when you start adjusting contrast, brightness, and noise, you’ll thank yourself for shooting RAW.Bonus Settings & Tips
Turn Off Image Stabilization
If your lens or camera has image stabilization (IS or VR), turn it off when using a tripod. Why? Because the system might “search” for motion, ironically creating some—blurring your shot in the process.Noise Reduction: Off or On?
For long exposures, some cameras offer long-exposure noise reduction. Turning this on can clean up grainy shots—but it also doubles how long each photo takes (the camera takes a second black frame and processes noise out). If you’re in no rush, turn it on. Otherwise, do your noise clean-up in editing software later.Composition: More Than Just Point and Shoot
Include Foreground Interest
Sure, the stars are stunning on their own, but photos get way more interesting with some context. Think of a silhouette of a tree, a tent glowing softly, or a winding road lit by your headlights. It adds depth and tells a story.Follow the Rule of Thirds
Use gridlines on your camera to place the horizon low in the frame (bottom third), letting the sky dominate. It’s a classic move that works like magic.Edit Like a Wizard (But Keep It Real)
Once you've got your RAW images, it’s time to bring them to life with some gentle editing. Apps like Adobe Lightroom or even free options like RawTherapee work wonders.Here’s a basic editing workflow:
- Bump up Contrast and Clarity to make stars pop
- Adjust Exposure gently if your shot’s too dark
- Increase Whites, slightly lower Blacks for depth
- Play with Color Temperature for the mood (cool blue, warm tones, etc.)
- Use Noise Reduction tools to clean up grain—but not too aggressively
Remember: edit to enhance, not fake. Don’t turn the Milky Way into a neon cloud unless that’s what you’re going for artistically.
Ideal Conditions: The Right Time and Place to Shoot Stars
Avoid the Moon
Unless you’re going for a moonlit landscape, a bright moon washes out the stars. A new moon (or close to it) is best.Get Away From Light Pollution
Cities = light pollution = no stars. Head to places miles away from urban glare. National parks, deserts, or high-altitude spots are perfect.Check the Weather
Clear skies are obvious, but even a bit of haze or humidity can mute the stars. Use weather apps like AccuWeather and sky prediction tools like Clear Outside.Use Star Tracking Apps
Apps like Stellarium, Sky Guide, or PhotoPills help you locate constellations, planets, and even the Milky Way’s core. Super helpful for planning your shot.Practice Makes Perfect
Seriously, your first night might feel like fumbling in the dark—literally and creatively. But don’t get discouraged.Try different ISO levels, lens angles, or focal distances. Sometimes the best photo comes after two hours of experimenting. Sometimes it’s your first shot. Either way, every time you try, you’ll learn something new.
Bring a friend, a thermos of coffee, some patience, and your sense of wonder. Because in the end, photographing the stars isn’t just capturing a picture—it’s capturing a feeling.
Final Thoughts
Capturing starry skies during your travels isn't just about the gear or the settings. It's about being present, standing in silent awe under a vast, glittering sky, and bottling that moment in a frame.So next time you're planning a trip, maybe add ‘star photography’ to your checklist. Whether you’re in the Alps, the Sahara, or a quiet rural town—you’ve got the tools now to bring home photos that feel like magic.
Don’t just look up. Shoot up.
all images in this post were generated using AI tools
Category:
Photography TipsAuthor:

Shane Monroe
Discussion
rate this article
3 comments
Fleur Frye
Nothing says ‘I love you’ like a romantic night under the stars—unless you forget the telescope. Pro tip: leave the astrophysics to the experts and just enjoy the twinkling show above!
June 18, 2025 at 3:37 PM
Shane Monroe
Absolutely! Sometimes the simplest moments create the best memories. Enjoying the stars is all about the experience, not the equipment!
Cynthia Soto
Looking to snap the cosmos? Just remember: if you can’t find the North Star, it’s probably hanging out with your lost luggage! Pack a tripod, some snacks, and embrace the adventure—because nothing says ‘I love nature’ like tripping over a rock while photographing a meteor shower!
June 18, 2025 at 4:46 AM
Shane Monroe
Haha, great tips! A tripod and snacks are essential—both for stability and energy. Happy stargazing!
Dominic Bailey
Great insights! The tips on choosing locations with minimal light pollution and optimal weather conditions are essential for capturing stunning starry skies. I appreciate the practical gear recommendations too—definitely taking notes for my next adventure!
June 17, 2025 at 2:50 PM
Shane Monroe
Thank you! I'm glad you found the tips helpful. Wishing you an amazing adventure capturing those stunning starry skies!